Raspberry PI as Headless Spotify Connect Player
Raspberry PI as Headless Spotify Connect Player
Guide by Pascal Krumme, originally posted on instructables.
This Instructable is associated with my Retro Music Streaming Box. I will show in detail how to set up a Raspberry Pi 2B or 3 to work as a headless Spotify Connect client.
Requirements:
Raspberry Pi with headless Raspian Jessie
Eltechs Exagear License (https://eltechs.com/product/exagear-desktop/exagea…
Spotify Premium Account
An SSH Client (like Putty: www.putty.org)
A VNC Client (like UltraVNC: www.uvnc.com)
It is also possible to install a trial version of the exagear environment. This requires additional tools and I could not test what happens when upgrading to a full license.
Step 1: Installing Exagear
At first you have to buy the Exagear License using the link from the intro. Make shure to select the right version for your RPI.
Once you did they will provide with a licence key and a download link. Download the file either directly onto the Pi or via another PC. Make sure the file is in your homedir (sth. like /home/pi/exagear.tar.gz)
Now log on to you Pi using SSH and to the following:
mkdir exagear mv exagear.tar.gz ./exagear
cd exagear
tar -xvzpf exagear-desktop-rpi2.tar.gz
Now you have to put your license key file into the exagear directory. Then run:
sudo ./install-exagear.sh ubuntu-1404
It is really important to install the Ubuntu 1404lts guest system as it is the only one which is works with Spotify. The installation may take a while. In the next step we will install Spotify in the Exagear environment.
Step 2: Installing Spotify
Now that you have successfully installed Exagear. Next thing is to install Spotify in the Exagear guest system.
Start exagear by executing:
exagear
As you may have noticed, there is no display attached to the Pi so there is no possibility to access the Spotify GUI. To circumvent this, we install a virtual framebuffer and make it available over vnc.
sudo apt-get update
sudo apt-get upgrade
sudo apt-get install tightvncserver
Configuring will be done later… Now install Spotify.
sudo apt-key \
 adv --keyserver hkp://keyserver.ubuntu.com:80 \
 --recv-keys BBEBDCB318AD50EC6865090613B00F1FD2C19886
sudo echo deb http://repository.spotify.com \
 stable non-free | sudo tee /etc/apt/sources.list.d/spotify.list
sudo apt-get update
sudo apt-get install spotify-client
Thats it, in the next step we will set everything up an try to start Spotify.
Step 3: Configure the VNC Server and Start Spotify
Now it is time to setup the VNC server which we want to run Spotify on.
Now create a new file using nano:
sudo nano /etc/init.d/tightvncserver
Paste following code into the file:
# Provides: vncserver
# Required-Start: networking
# Required-Stop:
# Default-Start: 2 3 4 5
# Default-Stop: 0 1 6
# Short-Description: Starts VNC
# Description:
### END INIT INFO

export USER='pi'
eval cd ~$USER
# Check state
case "$1" in
  start)
    su $USER -c '/usr/bin/vncserver :1 -geometry 1280x720 -depth 24'
    echo "Starting vncserver for $USER"
  ;;
  stop)
    pkill Xtightvnc
    echo "vncserver stopped"
  ;;
  *)
    echo "Usage: /etc/init.d/vncboot {start|stop}"
    exit 1
  ;;
esac
exit 0
Hit CTRL-X y to save and exit.
After that, change the file permissions using:
sudo chmod 755 /etc/init.d/tightvncserver
Then add an autostart entry by executing:
sudo update-rc.d tightvncserver defaults
Now start the VNC Server:
/etc/init.d/tightvncserver start<br>
You will then be prompted to enter your user password (raspberry in most cases) and to create a password to access the vnc server.
Next we start Spotify by executing:
DISPLAY=localhost:1.0 spotify
Now you can try to connect to the VNC server using a VNC client (for example UltraVNC). By default, the VNC server we have just installed runs on port 5901.
Step 4: Running Spotify
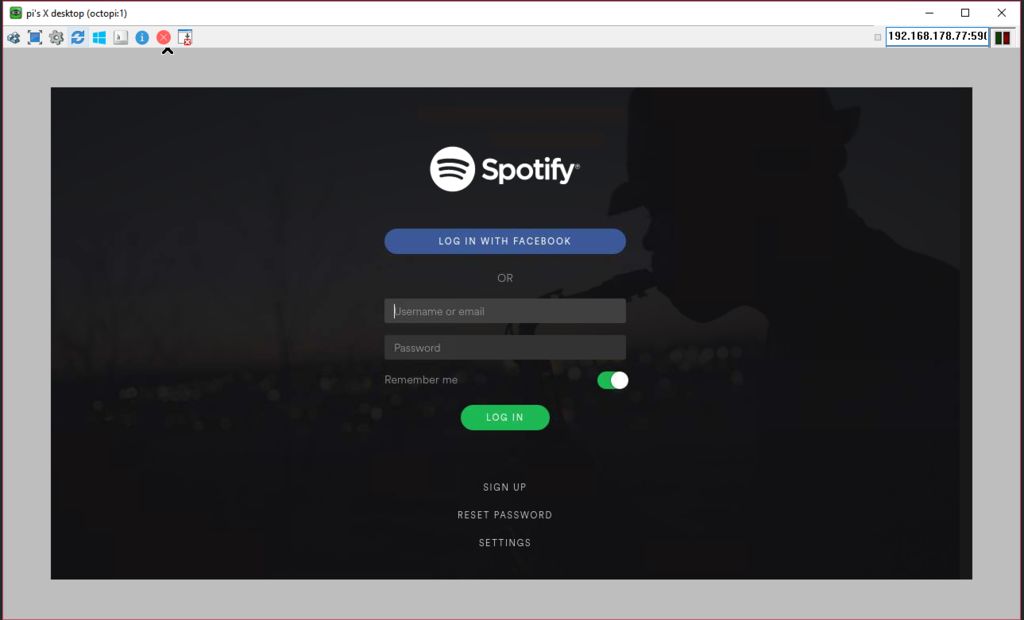
If you see this in your VNC Client, most of the hard work is done.
Enter your Spotify account and click login. If you successfully logged in, switch back to you ssh session and kill the program using CTRL-C.
Step 5: Setting Up the Autostart
Next step is to set everything up to start directly on boot. This basically consists of two additional script files in different directorys of the host and the guest system. As we did all previous steps in the Exagear guest system we start with the start script here.
Create a new file with nano by executing:
sudo nano /usr/local/spotify_start.sh
In nano, paste following code:
#!/bin/bash
export USER='pi'
su $USER -c 'tightvncserver'
DISPLAY=localhost:1.0 su $USER -c 'screen -S spotify -d -m spotify'
Hit CTRL-X y to save and exit.
Now change the file permissions with:
sudo chmod 777 /usr/local/spotify_start.sh
Thats all for now in the exagear environment. Type:
exit
To return to the host system.
Now that we have created a script inside the guest system in a directory which is accessible form the host system we can write a script that executes it on startup of the raspberry.
Type:
sudo nano /etc/init.d/spotify_exagear
To create the file and paste following code:
#! /bin/sh
# /etc/init.d/spotify_exagear
# Provides: Spotify in the exagear env
# Required-Start: networking
# Required-Stop:
# Default-Start: 2 3 4 5
# Default-Stop: 0 1 6
### END INIT INFO
case "$1" in

 start) echo "Setting Volume, Starting Spotify"
   sudo amixer set PCM -- 400
   sudo exagear -- /usr/local/spotify_launch.sh ;;
 stop) echo "Stopping script blah"
   sudo exagear -- killall spotify ;;
 *) echo "Usage: /etc/init.d/blah {start|stop}" exit 1 ;;
 esac

exit 0
Hit CTRL-X y to save and exit
Now change the file permission:
sudo chmod 755 /etc/init.d/spotify_exagear
And setup the autostart:
sudo update-rc.d spotify_exagear defaults
Step 6: Congratulations
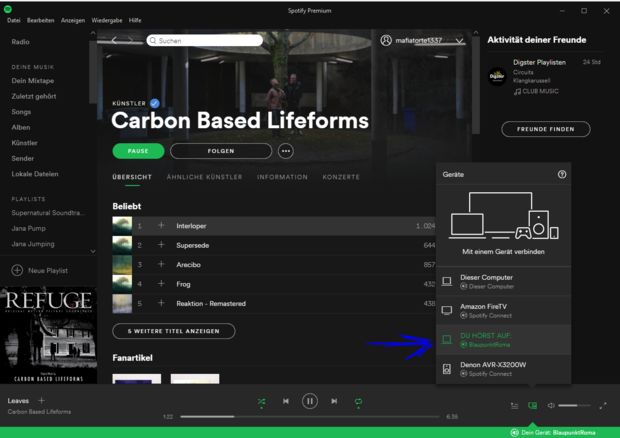
That´s it. You should now be able to use your Raspberry Pi to Stream music via Spotify Connect. Even the volume control works perfectly.To change the device name in the Spotify connect dialog, simply change the hostname with the raspi-config utility.
Sources:
- https://eltechs.com/run-spotify-on-raspberry-pi/
- https://www.spotify.com/de/download/linux/http://www.forum-raspberrypi.de/Thread-tightvncser… (in german)
- https://www.raspberrypi.org/blog/raspberry-pi-2-on… (Raspberry Pi Image)
- https://de.wikipedia.org/wiki/Spotify#/media/File:… (Spotify Logo)