Re-use your old Raspberry Pi as a music player
Re-use your old Raspberry Pi as a music player
Note that the HiFiBerry DAC shown in this guide is not available from us anymore. You might check sites like eBay to find a used board.
With the release of the new Raspberry Pi 2, a lot of people will replace their existing Raspberry Pi model A or B with a new Raspberry Pi 2B. But it would be a shame to throw the old Raspberry Pi away. While it’s true that the new one is more powerful, there are a lot of things that don’t require much processing power. One of these is music playback.
Here is a simple way to use a HiFiBerry DAC to transform your old Raspberry Pi into a high-quality audio system in about half an hour. These instructions assume you have the standard HiFiBerry with the RCA connectors and are using a Windows PC for setting up and controlling the system.
This guide will also work if you have a newer model A+ or B+, or even if you want to use the new Raspberry Pi 2. In these cases, it’s much easier. You don’t need to solder something onto the board. Just use the new HiFiBerry DAC+ and plug it onto the Raspberry Pi.
Step 1: Add the P5 header to the Raspberry Pi
I2S is the source of the highest-quality audio available from the Raspberry Pi. Here is how to get access to this great audio stream. You need to start with a version 2 Raspberry Pi. Most of the Raspberry Pis are version 2, but this is how to recognize each version. The biggest visual difference is the addition of the two gold-ringed mounting holes on the version 2.
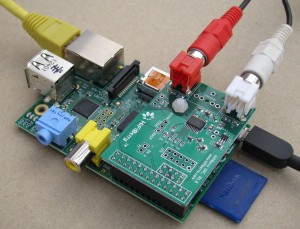
The 8-pin header is supplied with the HiFiBerry. It needs to be soldered into the holes adjacent to the GPIO connector (labelled P5). The picture on the left shows the holes for locating the new header just below the big GPIO connector. The picture on the right shows the new header in place. This is really not that hard, but there is a great demonstration video if you need convincing, which can be found here.
Step 2: Plug it all together
If you have the nylon standoff, install this into the Raspberry Pi mounting hole. Alternative standoff systems can also be made to work well, but be careful not to short anything on either board.
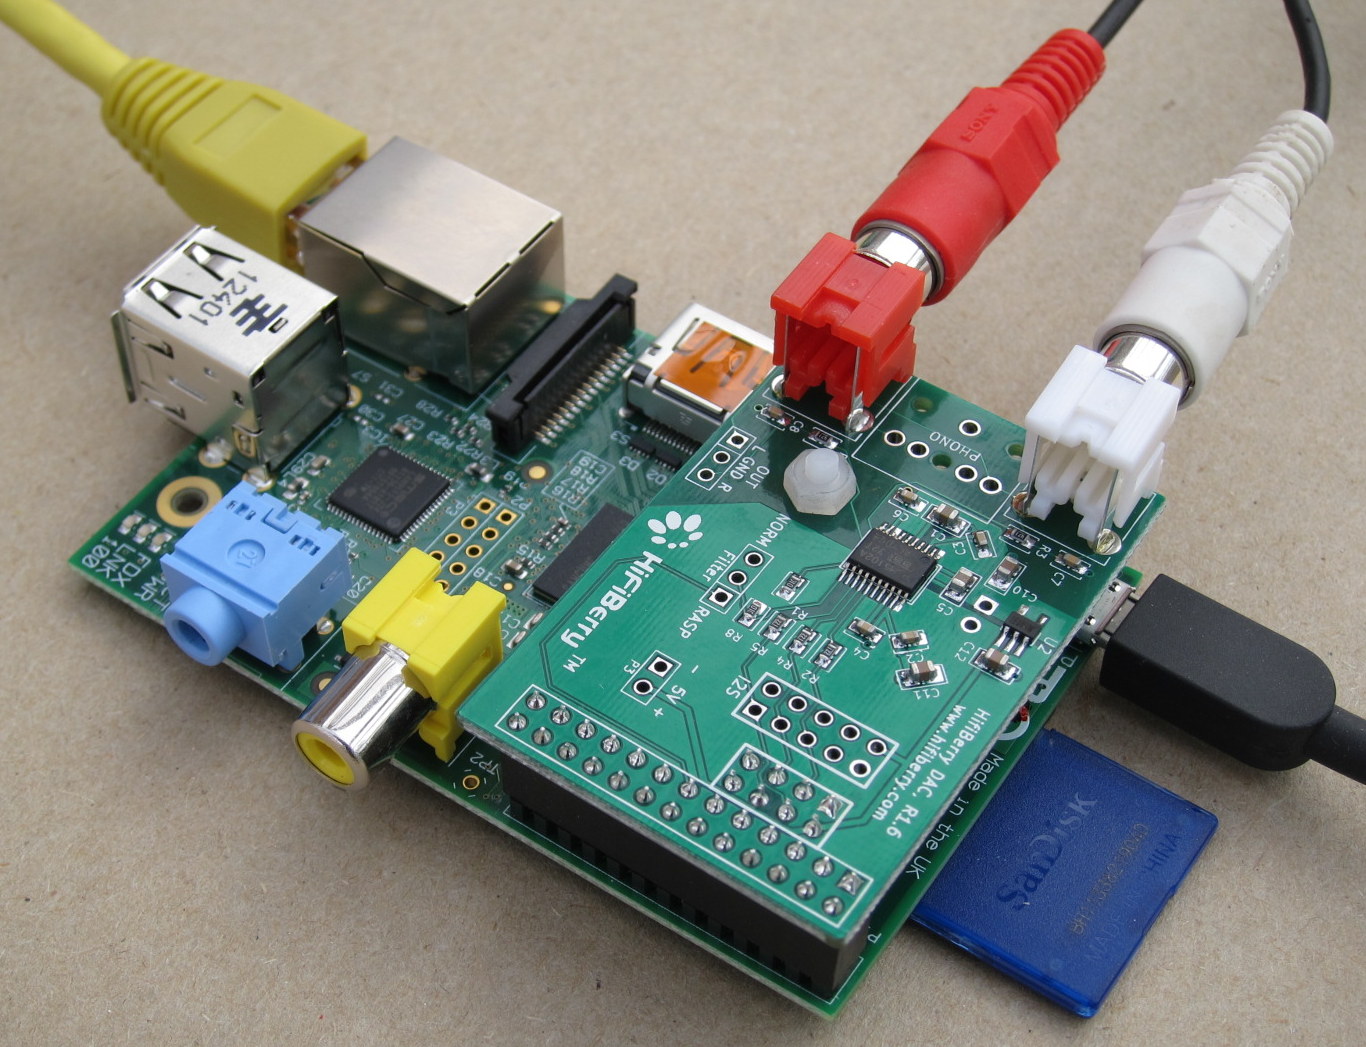
Plug the HiFiBerry into the GPIO and P5 headers while locating onto the standoff. Be sure all three align before pushing down. It’s a snug fit, but doesn’t take much force. Clamp it in place with the nylon nut on top of the standoff.
Now that the the hardware’s sorted, it’s time to connect up your Raspberry Pi assembly. You’ll only need to connect the power into the microUSB socket and plug your Ethernet cable into the Ethernet socket (wireless is easy, but that’s for next time). Then, connect your RCA leads from your amplifier to the sockets on the HiFiBerry.
Step 3: Create a Volumio SD card
Volumio is a great pre-packaged operating system distribution for the Raspberry Pi. It’s based on Debian (like Raspbian), but has a lot of audio optimizations and provides a simple interface for playing audio right from start-up with minimal messing around. Download the latest SD card image for Raspberry Pi from here: http://volumio.org/get-started/
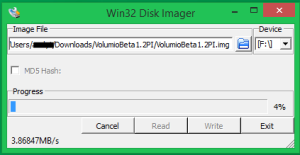
Unzip the image file from this download. On Windows, open the downloaded file in Windows Explorer and click on ‘Extract all’. Make a note of where the file extracts to—typically ‘C:/Users/<user>/Downloads/VolumioBeta1.2PI’.
Program an SD card with this image. A simple way of programming an SD image on Windows is to use Win32DiskImager, available from: sourceforge.net/projects/win32diskimager/. Be careful to select the correct drive for your SD card. Make sure you don’t have any other SD cards plugged into the computer. The easy way to check this is to have Win32DiskImager running and then plug in the SD card. The correct drive letter should appear in the ‘Device’ field. You can double-check by looking at the drives listed in Windows Explorer. Then select the correct image file as the ‘.img’ file that you created in the last step. Finally, click on ‘Write’. You’ll get a confirmation box warning you to make sure you’ve really selected the correct SD card. Once you’ve checked and allowed Win32DiskImager to continue, it will take several minutes to program the card.
Once programmed, plug the SD card into your Raspberry Pi.
Step 4: Configure Volumio
Power up the Raspberry Pi and wait for it to boot. Connect to Volumio from any computer on your network by entering this address into the address bar of your browser: volumio.local. You should see the main Volumio screen, which will look something like this:

Setup your music source by going to the top right side of the Volumio screen, click on the ‘Menu’, and select ‘Library’ from the pull-down menu. This now shows the potential sources for your audio that Volumio can handle. Assuming you have some audio on a NAS drive, click on ‘add new mount’. On the new screen that’s presented, you need to enter the following information:
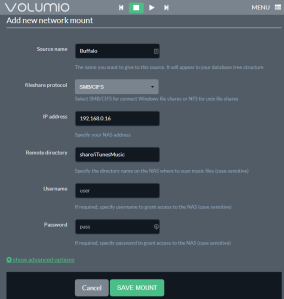
- Source name: You can make this up—it’s just for your reference when accessing music later.
- Protocol: You can probably leave this as SMD/CIFS in a Windows environment.
- IP address: You need to enter the address of your NAS box. If you’re not sure what this is, I find that a network scanner can be useful. For instance, try this one: www.advanced-ip-scanner.com/
- Remote directory: This is the directory where your music can be found on your NAS box.
- Click ‘save mount’. There will be a pause with a ‘connecting’ message; then you’ll see a message from Volumio telling you that it’s scanning your music collection and indexing it. The index will allow it to rapidly list your music collection. Don’t panic if this takes quite a long time—this indexing only happens once. You’ll also need to rerun the indexing if you add to your music collection.
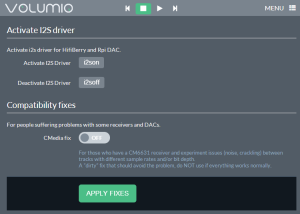
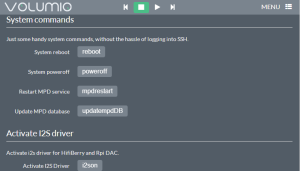
While that is indexing, you can configure Volumio to use the HiFiBerry. From the Volumio main page, select ‘system’ from the top right drop-down menu. On this new page, select ‘Activate I2S Driver’. This section is also labelled with a reference to HiFiBerry.
Once all this setup is complete, reboot your Raspberry Pi. Volumio provides a helpful button to reboot on this page.
Step 5: Enjoy great audio
Once the Raspberry Pi has rebooted, go back to the main Volumio page and choose something to listen to by clicking ‘Browse’ in the bottom left of the screen. This will show you a list of music sources that you have configured. One of these should be the NAS label that you entered above. Click on this and you’ll see the top-level listing of your music collection. Just browse through, pick your favorite, and enjoy great sounding audio.

This article contains the best description that we could create at the time of writing for helping you understand how to get your system up and running. It will not apply in all circumstances, since there are so many variables outside of our control. Please give us feedback on how well these notes help you in our forum.